With the iOS 17 update release and the temptation to upgrade to the new iPhone 15 or 15 Plus (or even the iPhone 15 Pro or Pro Max), it’s probably a good idea to consider backing up your iPhone. Maybe you want to try out the cool new features from the software upgrade, or maybe you’re taking precautions in case your iPhone is lost or stolen. Whatever the reason, taking a few minutes to safeguard valuable memories like photos, videos and text messages can spare you a future regret. Even better, there’s several ways you can do it.
The easiest way to back up your iPhone is through iCloud, but Apple’s online service does have its limits. You might see the dreaded “not enough iCloud storage” error message, which won’t allow you to back up, but don’t fret.
I’ll also walk you through backing up your iPhone to iCloud to both Mac and Windows, which don’t require cloud storage. And I’ll even show you how to troubleshoot and work around some of iCloud’s limits.
For more, check out this checklist of things you should do before updating to iOS 17 before it drops today. (Spoiler: Backing up is definitely one of them.)
Go Inside the Apple iPhone 15 and iPhone 15 Pro: See How the New iPhones Look and Work
See all photos
iCloud: When everything works like it’s supposed to
iCloud is a free service (more on that later) that’s tied to your Apple ID and that you can use to back up your iPhone. However, it doesn’t back up everything on your phone. Things you buy with your Apple ID, such as apps or music, won’t back up because Apple has a receipt that you already bought them so you can download them again for free. Email, contacts and calendars are usually synced with your email account like Gmail, but in some cases, you might also sync these things with iCloud.
You can double-check all this by going to Settings and then going into either Mail, Contacts, Calendar, Notes or Reminders. In any of these settings, you can tap Accounts to view your various accounts. Under each account, you can see what’s being synced: mail, contacts, calendars and so on.
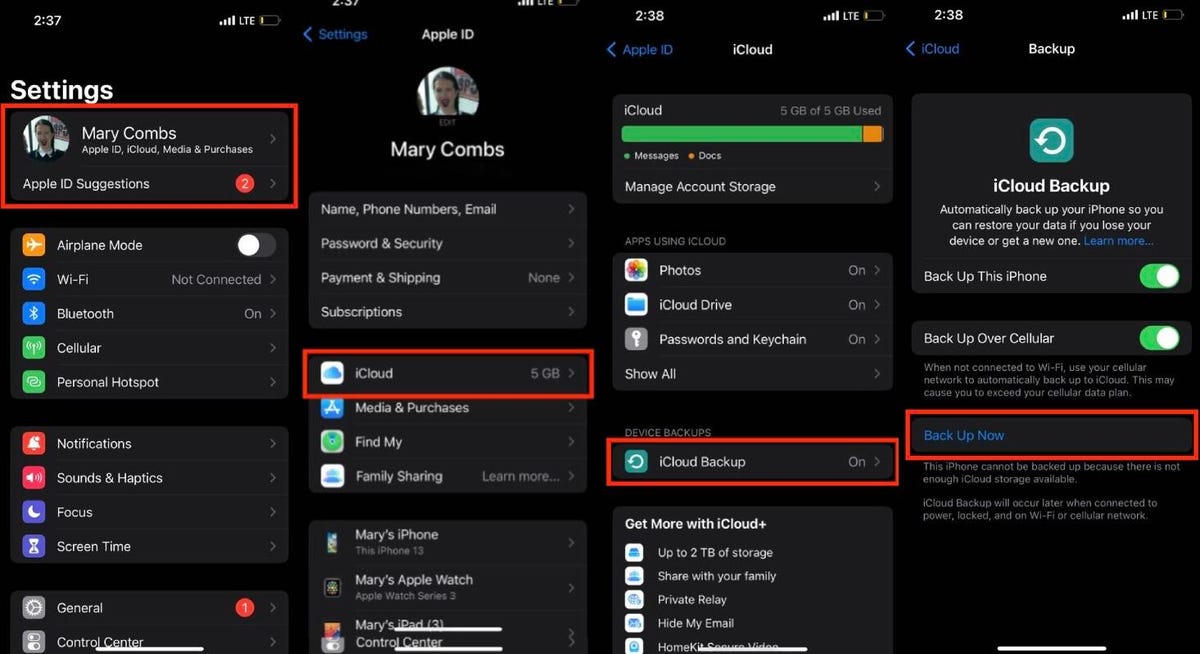
To start a backup to iCloud, connect your iPhone to Wi-Fi and then go to Settings and tap the Apple ID/iCloud tab at the top, which also has your name. If you’re not signed in, take a moment to do so and then tap iCloud. On the next page, scroll down and tap iCloud Backupenable iCloud Backup, and then tap Back Up Now to start.
The setting that tells your phone to maintain automatic iCloud backups, as well as the button to Back Up Now are buried deep within the Settings app, one screen past the backup settings for individual apps.
Depending on how much data you have, or if this is your first time backing up to iCloud, the backup process could take a few minutes or an hour. Check below the Back Up Now button to see the exact time and date your phone was last backed up. Now, any time your iPhone is connected to power, locked and on Wi-Fi, it will automatically back up whatever new data you have to iCloud.
‘This iPhone cannot be backed up because there is not enough iCloud storage’
If that iCloud backup worked just fine, then great, you’re done. But I realize a lot of people won’t be able to back up to iCloud without a little work. You might see this message on your iOS device: “This iPhone cannot be backed up because there is not enough iCloud storage available.”
Every iCloud account gets 5GB for free. But most people have more than 5GB of data on their phone — or they have more than one iOS device that needs backing up. Hence, 5GB just isn’t enough space. And maybe one day Apple will change its free tier to give us more data and make backing up easier for everyone. But until then, we need to do some calculations to optimize our iCloud accounts.
Figure out iCloud backup size
As I mentioned earlier, iCloud doesn’t back up every last thing on your phone. Instead, it takes a smart approach and won’t back up things that are synced with your internet accounts or that you’ve purchased with your iTunes Apple ID. To figure out exactly how much iCloud space your backup file will take, go to Settingstap on your Apple ID and then go to iCloud > Manage Account Storage > Backups. There’s a list of devices that are backing up or trying to back up with your account.
By the way, if you see multiple backups of the same phone, take a look at how old each one is. You might have an older iPhone backup that you can delete to open up iCloud space. Once you’re done purging this list, tap on the name of the device you’re currently using.
Give your phone a few moments to figure things out, then look at the top of the screen. You should see the following details: Last Backup, Backup Size and Next Backup Size. If you haven’t backed up your iPhone to iCloud before or in a long time, the Next Backup Size will be a pretty large amount of data. Obviously, if it’s more than 5GB, you must either buy more storage or adjust what you’re backing up.
Change what gets backed up to iCloud
Lower on the screen under Next Backup Size is a list where you can Choose Data to Back Up. This list will have apps and how much data each has to back up. The list goes from what takes up the most space to the least. If you just need a slightly smaller backup file, uncheck larger data items from the list if you don’t mind whether or not they’re backed up.
If all you wanted to back up was your camera roll, the only setting you’d need to toggle would be iCloud Photos. Besides Photosthere is a list of every other iCloud-enabled app on your iPhone, starting with Apple’s own apps. Besides Photos, the two biggest data hogs using your iCloud storage tend to be Mail and Messages. If you turn off the iCloud backup settings for these two apps however, old messages won’t be restored in case you get a new phone.
Buy more iCloud storage with iCloud Plus
This is the part no one likes to do, but Apple does offer four price tiers for storage: the free 5GB, $1-per-month 50GB, $3-per-month 200GB or $10-per-month 2TB plans. For even more space, iCloud Plus is getting two more options that gives you the option to buy 6TB or 12TB storage plans for $30 per month and $60 per month, respectively. (Note, Apple doesn’t have annual pricing.)
I realize that the idea of paying Apple more money on top of what we already spend on devices, accessories and AppleCare may not sit well. But if you lost your iPhone and were told you could download a backup of all of the data from your lost phone for just $36, you’d probably say yes. And that’s how much the 200GB extra storage plan on iCloud costs for a year. (If you need more space than that, well, it does get a bit spendier.)
Use your Mac
A few years ago, with the release of MacOS Catalina, Apple replaced and fragmented iTunes, which used to be how you backed up your iPhone. Now, you must use Finder, but the process to back up your phone is still as simple as ever.
On your Mac, open a Finder window from the Dock. Next, select your device from the sidebar under Devices. Then on the right-hand side click on the General tab. Finally, click Back Up Now. Depending on how much data you have, this could take a while.
Use your Windows
If you’re on Windows, good ol’ iTunes is still alive and kicking (you can download it here), and you can use it to back up your iPhone. According to Apple, all you have to do is plug your iPhone into your computer, give your devices permission to talk to each other and then click on the small iPhone icon on the top left side of the iTunes window.
Click Summary and then scroll down to the Backup section, and under the Backup section click Back Up now. After some time, your computer will have a backup file of your iPhone. To double-check the file, go to the iTunes menu, select Editsthen Preferences and then choose the Devices tab. From there, you can see a list of any iPhone backups that you’ve made via iTunes.
Keep in mind that your backup is only as current as the last time you ran the process. Also, your backup file is only as safe as your computer is.
For more, here’s how to preorder the iPhone 15 and how to preorder the Apple Watch Series 9.


