
Very happy with how it runs so far! I have noticed a slight squeak. I can’t quite figure out what it is from. Or where its coming from
BHPian Jeroen recently shared this with other enthusiasts:
Work on the Jeep continues! The first thing I did this morning was to replace the oil filter. Out comes my trusted oil filter wrench again!
Even though this filter is placed horizontally, I always fill the new oil filter—in this case, about half full—otherwise, it will spill. And of course, very important, apply a little oil to the seal. Always double-check that the old seal is still attached to the old filter and not sitting on your filter mount!

And of course, and of course, only hand tight!
Next, I put the push rods back in. Cleaned each one. These are little tubes, they are hollow, so lubrication oil can circulate through them. I blew each one with compressed air. I poured a little oil into each canal on top of the tappet plunger cap seat. This is moved by the camshaft. Very easy having an underlying camshaft.

As I mentioned earlier it is really important to ensure each push rod goes back into the position it came from.

Same for the rocker assembly.

Of course, Some of the valves will be open, or half open and so on. So you just put the two bolts in each rocker assembly, hand tight. Next, slowly turn each bolt one turn at a time, so the rocker assembly can easily seat itself on the cylinder head and push the respective valve open.
Of course, the final tightening with a proper torque wrench!

With everything back in its place and the spark plugs still out, I cranked the engine at least two full turns. Just to make sure everything was moving smoothly and nothing got stuck.
Next, I put in the spark plugs. It is always good practice to close up the cylinder head asap after re-installation. So nothing can fall into the cylinder accidently anymore.
Cleaned each spark plug, checked the gap,

And again, set with the proper torque!

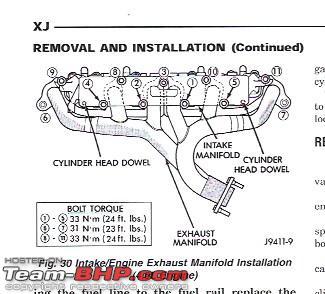
Next, the most challenging part on this engine. Putting the inlet and outlet manifold back on.
Make sure you install the new gasket correctly of course.

Slipping the gasket in is easy enough. There are two dowel pins and two studs.

The problem is putting the various bolts in. Especially those on the bottom of the manifold. It means crawling under the Jeep, scraping knuckles, lots of swearing and so on.
The good folks of Jeep have given this construction some careful thought and decided that these impossible-to-reach bolts also require three different kinds of torque values. Well, I can handle the recommended sequence of torquing. But there is no way to get a torque wrench on these bolts.
So this is how I improvise. I put my torque wrench at the average setting into the vice. I then take the spanner I will use and get a feel for how much I need to pull to get into the ballpark torque!

It took me the better part of three hours to get this inlet- outlet manifold properly installed!!

I had noticed underneath the air inlet filter there was some rust. So I quickly ran my pneumatic air brush over it and sprayed some paint on it.

Next putting some of the coolant hoses back on. Those special hose clip pliers are a godsend. Yes, you can do it with regular pliers and YouTube is full of special tricks. But I prefer to have the correct tool. Period!

Putting the Steering Pump back onto its bracket. It is held in place with these really long bolts.

There is a trick to these bolts. There is a special hole cut in the pulley. Impossible to install or remove otherwise.


I had left the valve cover off til this moment. It meant I had a bit more access to various bits. But now time to install the valve cover. New gasket. It also shows why some of the cylinder head bolts have these pins on top of them. They hold the gasket in place!

I had a bunch of different bolts and studs to fit to the valve cover. Luckily I had made various images, so easy to get everything back into its correct position.

Still had to clean the thermostat housing. Easy peasy of course.


Ready for re-installation once again.

The thermostat itself needed just a bit of wiping.

The thermostat and its housing are back on. Two different length bolts. Make sure you use the correct one. And, very importantly, don’t overtighten, you might crack the thermostat housing!

NOtice I have not fitted the coolant lines permanently. I leave one off, as I have found it helps to replenish the system through this line too.
Battery back on, a few bits and other parts and it looks like a proper Jeep engine room again.!!

I put lubrication oil into the engine and filled up the coolant system with coolant.
The movement of truth. Will she fired up and run properly!!
Sure enough. Started immediately. Full oil pressure within seconds. All cylinders firing!
https://www.youtube.com/watch?v=ZA_fFLU7YJM
I put the AC, rear heater, lights and the cabin fan on maximum. I want the engine to heat up so the thermostat opens. This usually requires some more coolant to be added.
Very happy with how it runs so far! I have noticed a slight squeak. I can’t quite figure out what it is from. Or where its coming from
One thing though, I’ve got some parts left over!

I spoke to Peter and he had a good idea of where these might be from. It MIght solve the tiny squeak as well.
I will have another good look tomorrow. There are two small things I still need to do as well. Also, I want to run the Jeep at idle on our drive onto the dike. Our drive is very steep, about 15-20o. These Jeeps are notoriously difficult to properly de-air. It helps when the front of the car is a little higher.
But all in all, I am pretty pleased with how things went!!
Jeroen
Check out BHPian comments for more insights and information.


