
GitHub Copilot has quickly become an integral part of how I build. Whether I’m exploring new ideas or scaffolding full pages, using Copilot’s agent mode in my IDE helps me move faster—and more confidently—through each step of the development process.
GitHub Copilot agent mode is an interactive chat experience built right into your IDE that turns Copilot into an active participant in your development workflow. After you give it a prompt, agent mode streamlines complex coding tasks by autonomously iterating on its own code, identifying and fixing errors, suggesting and executing terminal commands, and resolving runtime issues with self-healing capabilities.
And here’s the best part: You can attach images, reference files, and give natural language instructions, and Copilot will generate and modify code directly in your project!
In this post, I’ll walk you through how I built a developer-focused landing page—from product requirements to code—using GitHub Copilot agent mode and the Claude 3.5 Sonnet model. This kind of build could easily take a few hours if I did it all by myself. But with Copilot, I had a working prototype in under 30 minutes! You’ll see how I used design artifacts, inline chat, and Copilot’s awareness of context to go from idea → design → code, with minimal friction.
You can also watch the full build in the video above!
Designing with AI: From PRD to UI
Before I wrote a single line of code, I needed a basic product vision. I started by using GitHub Copilot on GitHub.com to generate a lightweight product requirements document (PRD) using GPT-4o. Here was my prompt:
> “Describe a landing page for developers in simple terms.”
Copilot returned a structured but simple outline of a PRD for a developer-focused landing page. I then passed this PRD into Claude 3.5 Sonnet and asked it to generate a design based on that prompt.
Claude gave me a clean, organized layout with common landing page sections: a hero, feature list, API examples, a dashboard preview, and more. This was more than enough for me to get started.
You can explore the full design that Claude built here; it’s pretty cool.
Setting up the project
For the tech stack, I chose Astro because of its performance and flexibility. I paired it with Tailwind CSS and React for styling and component architecture. I started in a blank directory and ran the following commands:
npm create astro@latest
npx astro add react
npx astro add tailwind
I initialized the project, configured Tailwind, and opened it in VS Code with GitHub Copilot agent mode enabled (learn how to enable it with our docs!). Once the server was running, I was ready to start building.
Building section by section with Copilot agent mode
Copilot agent mode really shines when translating visual designs into production-ready code because it understands both image and code context in your project. By attaching a screenshot and specifying which file to edit, I could prompt it to scaffold new components, update layout structure, and even apply Tailwind styles—all without switching tabs or writing boilerplate manually.
For our project here, this meant I could take screenshots of each section from Claude’s design and drop them directly into Copilot’s context window.
| 💡 For the tip: When building from a visual design like this, I recommend working on one section at a time. This not only keeps the context manageable for the model, but also makes it easier to debug if something goes off track. You’ll know exactly where to look! |
Creating the hero and navigation section
I opened index.astroattached the design screenshot, and typed the following prompt:
> “Update index.astro to reflect the attached design. Add a new navbar and hero section to start the landing page.”
Copilot agent mode then returned the following:
- Created
Navbar.astroandHero.astro - Updated
index.astroto render them - Applied Tailwind styling based on the visual layout
And here’s what I got:
Now, this is beautiful! Though it doesn’t have the image on the right per the design, it did a very good job of getting the initial design down. We’ll go back in later to update the section to be exactly what we want.
Commit early and often
| 💡 For the tip: When building with AI tools, commit early and often. I’ve seen too many folks lose progress when a prompt goes sideways. |
And in case you didn’t know, GitHub Copilot can help here too. After staging your changes in the Source Control panel, click the ✨ sparkles icon to automatically generate a commit message. It’s a small step that can save you a lot of time (and heartache).
Improve accuracy with Copilot custom instructions
One of the best ways to improve the quality of GitHub Copilot’s suggestions—especially in multi-file projects—is by providing it with custom instructions. These are short, structured notes that describe your tech stack, project structure, and any conventions or tools you’re using.
Instead of repeatedly adding this contextual detail to your chat questions, you can create a file in your repository that automatically adds this information for you. The additional information won’t be displayed in the chat, but is available to Copilot—allowing it to generate higher-quality responses.
To give Copilot better context, I created a CopilotInstructions.md file describing my tech stack:
- Astro V5
- Tailwind CSS v4
- React
- TypeScript
When Copilot agent mode referenced this file when making suggestions, I noticed the results became more accurate and aligned with my setup.
Here’s what some of the file looked like:
# GitHub Copilot Project Instructions

## Project Overview
This is an Astro project that uses React components and Tailwind CSS for styling. When making suggestions, please consider the following framework-specific details and conventions.

## Tech Stack
- Astro v5.x
- React as UI library
- Tailwind CSS for styling (v4.x)
- TypeScript for type safety

## Project Structure
```
├── src/
│   ├── components/     # React and Astro components
│   ├── layouts/        # Astro layout components
│   ├── pages/          # Astro pages and routes
│   ├── styles/         # Global styles
│   └── utils/          # Utility functions
├── public/             # Static assets
└── astro.config.mjs    # Astro configuration
```

## Component Conventions

### Astro Components
- Use `.astro` extension
- Follow kebab-case for filenames
- Example structure:

```astro
---
// Imports and props
interface Props {
  title: string;
}

const { title } = Astro.props;
---


```
You can explore the full instructions file in my repo, along with the full code, setup instructions, and a link to the deployed landing page.
Iterating on your designs by prompting Copilot
I then repeated the same process to build each new section. Here’s what this looked like in practice:
“Built by Developers” section
> “Add a new section to the landing page called ‘By Developers’ and follow the attached design.”
Copilot generated a reusable component with feature cards structured in a Tailwind-styled grid.
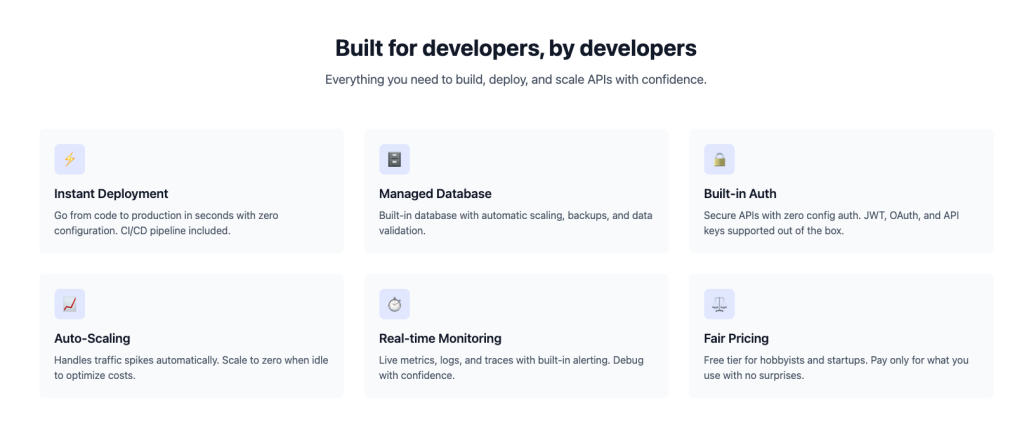
“API development” section
> “Add the API development section based on the design.”
This section featured interactive code samples in tabs. Copilot interpreted that from the screenshot and added UI logic to switch between examples—without me asking.
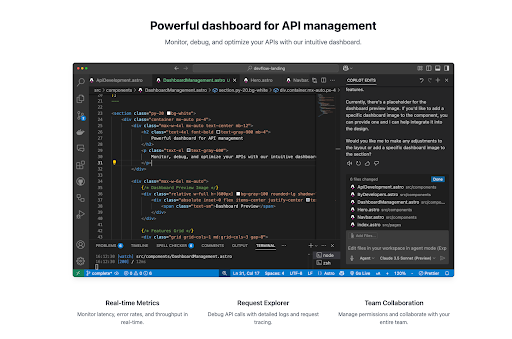
“Dashboard preview” section
> “Now add the dashboard management section on the landing page based on the design.”
I uploaded a screenshot of my editor as a placeholder image, and Copilot added it seamlessly to the new component.
It’s so amazing how fast we’re building this landing page. Look at the progress we’ve already made!
Smart suggestions, fast results
Even with sections like “Trusted by Developers” and “Try it Yourself,” Copilot created placeholder images, added semantic HTML, and applied Tailwind styling—all based on a single image and prompt. 🤯

When I updated the final hero section to match the layout more closely, Copilot flagged and fixed TypeScript issues without being prompted.
That might sound small, but it’s a big deal. It means Copilot agent mode wasn’t just taking instructions—it was actively understanding my codebase, looking at my terminal, identifying problems, and resolving them in real time. This reduced my need to context switch, so I could focus on shipping!
This wasn’t just a series of generated components. It was a fully structured, landing page built with modern best practices baked in. And I didn’t have to build it alone!
Wrapping up:
With GitHub Copilot agent mode and Claude working together, I was able to:
- Generate a usable PRD and design mockup with a single prompt
- Build a responsive Astro-based landing page in less than thirty minutes
- Scaffold, test, and iterate on each section with minimal manual coding
- Use natural language to stay in the flow as I developed
What’s next?
To complete this project, I updated the README with a clear project structure, added instructions for getting started, and staged it for deployment. From here, you can:
- Deploy it with GitHub Pages, Netlify, or your host of choice
- Set up GitHub Actions for CI/CD
- Add unit tests or accessibility checks
- Replace placeholder content with real data (like logos, dashboard, and profile images)
- Add new pages based on the Navbar
Want to explore it yourself?
Take this with you
AI tools like GitHub Copilot agent mode are transforming how we build, but like any tool, their power depends on how well we use them. Adding context, being explicit, and committing often made building this web page smooth and successful.
If you’re thinking about building with GitHub Copilot, give this workflow a try:
- Start with a PRD using Copilot on GitHub.com
- Generate a design from your PRD with Claude
- Use Copilot Agent in your IDE to code it, step by step.
Until next time, happy coding!
Written by

 vs Galaxy Watch Ultra: Main differences to expect")


